
hye guys.. ^_^ we meet again..sorry ya because dah lame x update my reflection on my authoring system class..actually i already done it draftly on my book..just not transform it into blog..hehehe salunye refleksi aku buat dlm buku dulu..hehehe lagi satu aku record ape yg lecturer aku ckp dlm kelas..so nk analyze setiap ilmu yang disampaikan tue take time sket..hehehe mesti korang xsabar kan nk tau ape yg dipelajari oleh aku dalam kelas authoring nie..hehehe serius ckp kelas nie sgt besttt...tp tuk week 3 as a first stage of learning dreamweaver, kitorang belaja how to install IIS. korg tau x ape itu IIS? huhu actually aku pun xtau sebenarnya..so after dah masuk kelas nie barulah aku tau..IIS nie adalah singkatan kepada Internet Information Server (IIS)..in short we call as IIS..kalo among students edu tech kitorg xdelah beria beno nk sebut panjang2..huhuhu kitorang shotform kan aje..hehehe jimat sket perkataan nk ckp..huhuhu IIS nie actually testing server..so kalo kite nk built up web ke kene ade testing server tuk test kemenjadian web yang kite develop tue.. ^_^ antara info yang aku dapat, if IIS xde, kite xboleh nk develop web using ahp or php through dreamweaver..so untuk hari ni nye dr.Zaida ajar mcm mane nk install IIS..so sekarang nie dengan bangga nye aku boleh lah ckp yg aku dah pandai dah nk install iis..huhuhu tp different types of windows cr nk install nye agak beza sikit la..so aku dibantu oleh rakan2 yang terer..ade yg kasi input through discussion via facebook page yang dicreate just for the purpose tuk discuss and ask if got any problem..hehehe untuk membuatkan korang xckp aku nie kedekut ilmu, so skrg aku nk kasi ilmu mcm mane nk install IIS..so lets take a look.. ^_^
HOW TO INSTALL INTERNET INFORMATION SERVER???
Step 1: Click 'Start'

Step 2: Click 'Control Panel'

Step 3: Click 'Programs (Install and Uninstall Program)'
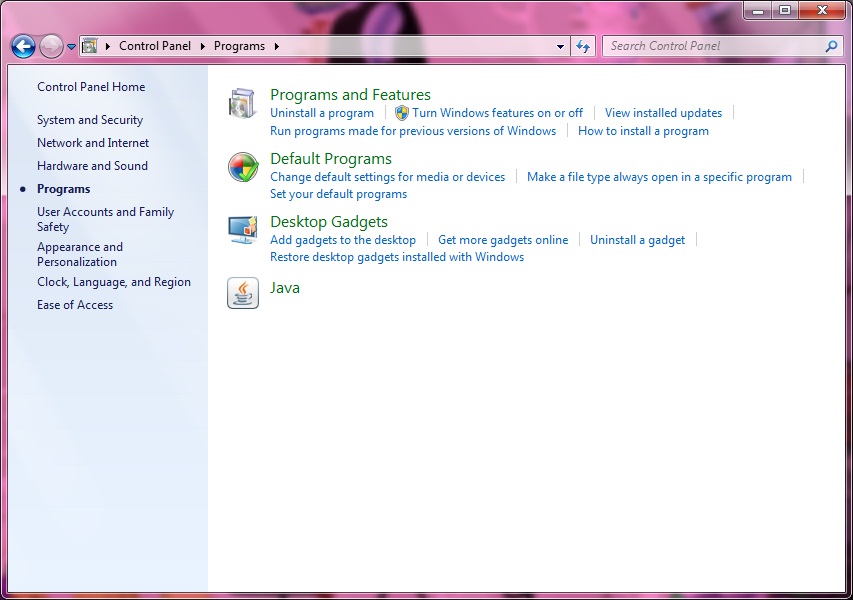
Step 4: Click 'Turn Window Features on or off'

Step 5: Tick all box for IIS box as below.

Step 6: Tick at box 'IIS Hostable Web Core' as below.
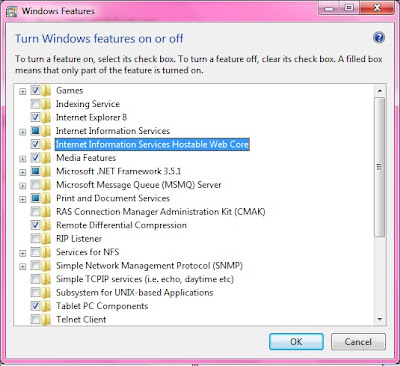
Step 7: Click 'OK'
yaaaaaaaa..............its DONE!!!!! easy rite? huhu at first agak complicated skit lah sbb kat lab pc nye window len..lappy aku gune window 7..so tutorial kat atas neh for those yg pki window 7...oppsss!!!! erm mcm mane nk tau kite nye lappy nie dah berjaya di install dengan IIS? hohoho jawapannye..lets wait for the next entry yaaaa.... ^_^
nie link video yang sedikit sebanyak boleh tolong yang face the problem..
0 comments:
Post a Comment