Tuesday 23 October 2012

❤ WEEK 7: Class Cancellation ❤

Posted by kErTaS PeNseL at 07:30 0 comments
yuHuuuuu!!!!!!!!!!!!!!!!!
hye korang!!!! ape khabarkah korang disane? mesti korang rindu aku kan..lame x post entry..hehe untuk week nie kelas authoring aku cancel kos Dr. Zaida ade seminar kat Sabah..so terpaksalah kelas dibatalkan..even though kelas batal, Dr. Zaida ade tinggalkan activity berkenaan ape yang di ajar dalam kelas untuk minggu2 yang lepas. so, pagi2 aku dah menapak ke library kos aku ade discussion dengan group member aku (mas & jannah) untuk task authoring yang ditinggalkan..kitorang pun berusaha lah menyiapkan task by follow all steps yang dah di ajar dalam kelas..actually during nk buat task tue banyak jugak difficulties..tp not too much lah if nk compared dengan task asp..aku lagi suke gune php neh..hehehe sbb easy and xyah susah2..pastue best pulak boleh built up dynamic webpage..hehehe asp pun boleh jugak tp banyak sgt prob nye..hehehe task yang kitorg siapkan nie pasal web yang gunekan dreamweaver jugak cume database nye create gune phpmyadmin mcm yang aku tulis dlm entry aku yang sebelum nie..huhuhu at last lepas berhempas pulas, aku dan 2 orang lagi member aku akhirnya berjaya siapkan task login page with security..hehehe so kitorg pun submit through e-learning for grading..hehehe 
ok guys..see you at the next entry yaaa....wait for my writing!!!! mmuuaaahhhh love yaaaaaaaaaa ^_^

Wednesday 10 October 2012

❤ Xampp Localhost ❤

Posted by kErTaS PeNseL at 09:26 0 comments
Welcome to my new Entry.. ^_^ dalam dok best2 tgk super spontan kos nk release tension, baru aku teringat yang aku xbuat refleksi untuk sambung entry aku semalam..yela smlm kan aku stop awal sbb aku ngantuk..huhuhu so arini kite continue dgn info baru eh..hehehe untuk entry kali nie, aku nk reflect pasal xampp localhost..after kite dah install xampp, start apache and mySQL, kite pun dah create php site using dreamweaver, so skrg kite nk check localhost untuk xampp..so how to check?


HOW TO CHECK XAMPP LOCALHOST AND CREATE DATABASE?

Step 1: Open any web browser and type localhost at address bar. It will appear as below.


*kalo korang type localhost tp xkeluar mcm kat atas nie, it means something wrong with ur apache..maybe it is not running..so need to check it at xampp control panel.


Step 2: Click 'Security' (to set the password) nie sebenarnye option..as admin up to us if we want to set the password or not..tp kalo tny aku, of kos lah aku nk set password..secure sket..huhu 

set up the password

Step 3: Click 'phpMyadmin' (masukkan username and password..if x set password xyah insert)

Inser 'username' and 'password'

phpMyadmin


Step 4: Create Database folder..dalam kelas aku gune 'dbase'. after create 'dbase' akan appear dbase(0)..it means that there is no table create yet..look at the picture below.


Tuesday 9 October 2012

❤ WEEK 5: PHP MySQL ❤

Posted by kErTaS PeNseL at 08:20 0 comments
yabedabeduuuuuuuu!!!!!!!! hye we meet again...miss u olllzzzz...huhuhu

seperti yang aku cakap dlm entry before nie, minggu lepas last aku belajar ASP using Dreamweaver..so dis week punye kelas aku belaja mengenai pHp MySQL..erm actually aku xpenah gune pun sebelum nie..nie lah first time aku tgk bende nie..hehehe in what ever pun just take it easy..kalo serabut lagi susah nk masuk..bak kata Dr. Zaida pHp MySQL is easy compared to ASP plus Access..huhuhu so now Lets EXPLORE it!!!!!!!! 

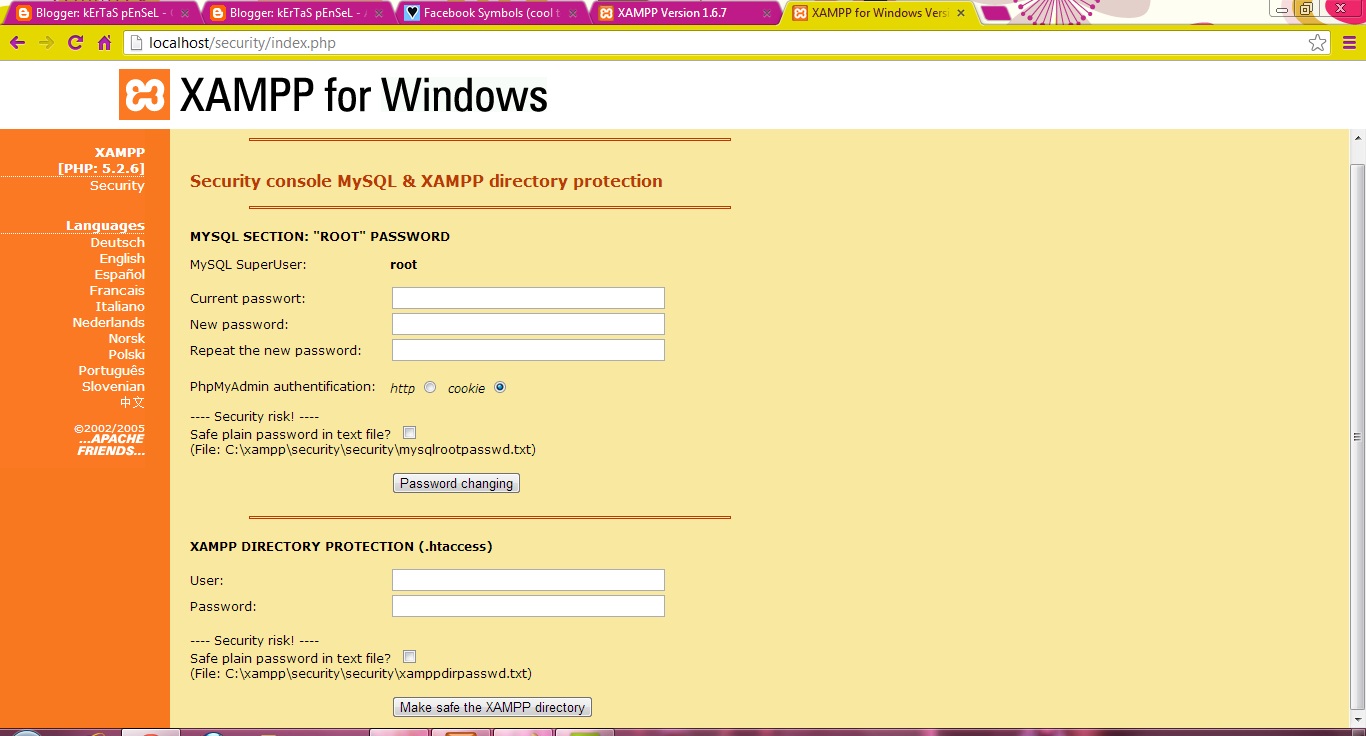
1) Untuk gune php MySQL kite kene install XAMPP...what is Xampp????? Actually xampp is an open-source cross platform. It consisting mainly of Apache HTTP ServerMySQL database, and interpreters for script written in the PHP and Perl programming languages. xampp ade apache and MySQL. For further info korang boleh refer sini.

2) Untuk kelas aku, lecturer aku dah kasi installer xampp..tinggal nk install je lagi..so kalo korang nk installer nye korang boleh la download kat website. xsusah pun..just tny kat pakcik google...just in a second die dh kasi kat korang..huhuhu nahh tinggal nk download je...huhu

3) CHOpppp!!!! erm after korang dah download installer tue..korang jangan terus install pulak..bak kate lecturer aku if nk install xampp tue kene off kite nye testing server first..korang ingat lagi x testing server tue ape? x ingat?? haaa cr balik dlm entry aku yang lepas2..huhuhu dah la, lambattt..aku proceed je lah..huhu testing server tue IIS la..huhu so bende alah nie korang kene off dulu..baru boleh install both..actually boleh je kalo korang nk install dua-dua..tp windows will use the same port..so kalo nk change kene edit setting la..kalo x, it will not running properly..after dah off testing server (IIS) then baru lah kite boleh install xampp..
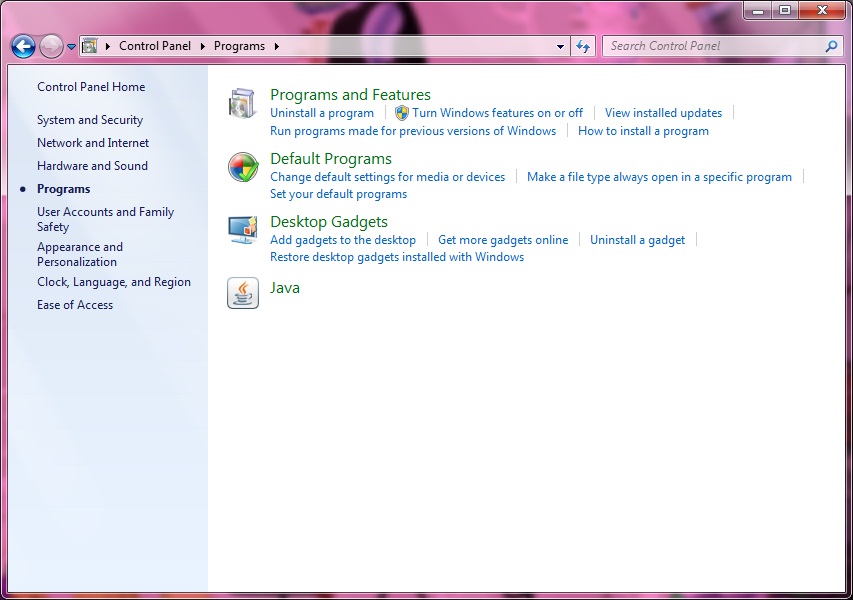

HOW TO STOP IIS?

Step 1: Click 'Start' and Click 'Control Panel'

Step 2: Click 'Administrative Tool'
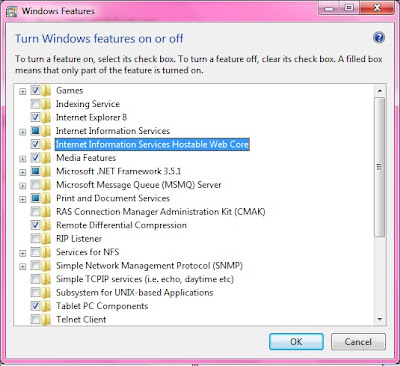
Step 3: Click 'IIS'

Step 4: Click 'Default Website'

Step 5: Click 'Stop' button.


HOW TO INSTALL XAMPP?

Step 1: Double click Xampp Installer

Step 2: Click 'Run'

Step 3: Click 'Next'

Step 4: save in C://

Step 5: Check 'Apache' and 'MySQL'

*Filezilla is just window explorer to manage the file. So, its up to you if u want to check it or not..its ok..huhuhu


AFTER INSTALL XAMPP, WHAT U SHUD DO?

Step 1: Click 'Start'

Step 2: Click 'Xampp Control Panel Application' (bende nie akan appear after korang click)


Step 3: Click 'Start' on apache and MySQL

If there is running mode, meaning that there is no problem and u may start create ur site. ^_^
easy rite??? hehehe


HOW TO CREATE PHP SITE USING DREAMWEAVER?

yuhuuu, actually cara nk create site same je mcm mane kite create ASP site gune dreamweaver..cume yang bezanye dis time kite gune PHP MySQL..

Step 1: Open Adobe Dreamweaver

Step 2: Click Menu 'Site'

Step 3: Click 'New Site' and korang create name tuk site korang then click 'Next'.

Step 4: Click 'Yes' and Choose 'pHp MySQL' as shown below then click 'Next'.


Step 5: Choose as below and where to save ur site? u shud save in htdocs folder. check it below.


Step 6: Click 'Next' then test URL..if success click 'Next'


Step 7: See pic below..


Step 8: Click 'Next'. this kind of window will appear.


last, click DONE!!!!!! taraaaaaaaaaa, dah siap create php site using dreamweaver..huhuhu

so, sampai sini je for this time punye entry eh..dah ngntuk..esok aku sambung lagi..hehehe

thanks ya for ur reading and support..wait for the next entry yaa..mmuuaaahhhhh
~~~~~~~~~~~~~~~~~~~~~~~~~~~~~~~~~~~~~~~~~~~~~~~~~~~~~~~~~~~~~~

Friday 5 October 2012

❤ Reading/Viewing Data using RecordSet❤

Posted by kErTaS PeNseL at 02:25 0 comments
hollaaaaaa!!!!!!! 
this entry nk review pasal Recordset yang aku belaja dalam kelas...the purpose of recordset nie sebenarnye untuk kite as admin web page review user yang insert diorg nye contact form gune web browser. tp untuk view back data gune web browser kite kene lah create view page. untuk info korg, page nie aku save nama view.asp..bukan ape, senang aku nk open file aku nnt..nk create view.asp file same je mcm kite nk create contact form td..cume beza nye kite xperlu insert form..so, hasilnye korang akan dapat mcm yang ditunjukkan di bawah..

view.asp (yang nie aku dah siap buat recordset)


HOW TO DO RECORDSET?

nk buat recordset nie same je mcm nk buat insert record...kalo korg rajin bukaklah entry insert record...tp aku tau korg pun mls nk click pegi balik pegi balik kan..so aku dgn baik hati nye buat lah sekali lagi..hehehe


Step 1: Click 'Server Behavior' Tab.

Step 2: Click (+) Sign and choose Recordset.

Then, korang browse connection gune connection yang korang dah create td..pastue just click 'OK'. so lepas buat recordset, kene buat repeat region pulak..repeat region nie untuk kite view back sume user yang dah isi data dalam contact form td...so??


HOW TO DO REPEAT REGION?

as usual, nk buat repeat region same je mcm nk buat insert record, recordset. cume ade beza sket je dalam step nye if nk compared dengan insert record and recordset..just check it below!!!


Step 1:  Kene select/highlight sume data mcm kat bwh nie..


Step 2: Click 'Server Behavior' Tab.

Step 3: Click (+) Sign and choose Repeat Region.


maka dengan ini siaplah kite punye asp page..hehehe nampak je mcm simple..tp banyak difficulties yang dialami..buat mcm nie nampak mcm easy..tp bile buat dan terus buat makin banyak yang dipelajari..ape yang penting? jgn tinggalkan even 1 step pun..kalo x, x jadi lah nnt...huhuhu so nie ilmu yang saya peroleh dalam kelas authoring untuk ASP..according to Dr. Zaida, akan ade task untuk disiapkan by group..so aku kene explore lebih lagi la..hehehe


~~~~~~~~```Sekian Terima Kasih````~~~~~~~


Thursday 4 October 2012

❤ Setup the CONNECTION ❤

Posted by kErTaS PeNseL at 23:51 0 comments
Assalamualaikum... ^_^ xjawap dosa..jawap suke kat saye..hahaha 
kalo korg dalam situasi mcm ni, apekah yg korang buat?? nk share idea or info boleh left ur comment ath the end of this entry yaa..peace!!!! eh3x, aku dah melalut dah nie..ok actually entry kali nie aku nk story yang sambungan entry lepas..kite brainstorm sket pasal entry yang lepas2 eh..kite dah create site, dah create database file n now kite nk cite mcm mane nk create connection between website and database yang kite dah create tadi. so untuk entry kali nie adalah mengenai setup connection. My Q is how to setup the connection? before kite move further let me briefly explain..utk ASP website ade dua jenis connection. 

a) DNS Connection

b) DNS-less connection (did not require the data DSN) 
also know as Custom Connection Strings

so, dalam kelas td aku gune DNS-less connection untuk connect database file aku dengan web application..so step untuk create connection korang boleh explore entry nie ya..


HOW TO SETUP CONNECTION?


Step 1: Open Adobe Dreamweaver.


Step 2: After open Adobe Dreamweaver, column Create New choose ASP VBScript..lepas tue akan appear mcm nie..


Step 3: Lepas dah appear mcm gambar dalam atas tue..korang cube tgk on ur right hand site..click Databases and click the (+) sign button on the panel as shown below.


Step 4: Then, choose 'Custom Connection String' and akan appear seperti pic di bwh.. ^_^


Step 5: Column 'Connection Name' korang letak je name ape pun yang korang suke...utk connection string nie actually lecturer aku kasi link kat elearning..hehehe so after setel sume nie try test connection yang connect to database..if ok just click 'OK'..and DONE!!!!!! pada awalnye leceh lah jugak skit..tp lame2 dah ok..sbb tue org ckp practice make perfect..kene salu practice supaya xlupe step..hehe

see!!!! mcm nie lah way to setup connection..-END- thanks for ur readinggg.. ^_^ if ade ape2 yang nk diimprovekan boleh leave u ollz punye comment ye..

~~~~~~~~~~~~~~~~~~~~~~~~~~~~~~~~~~~~~~~~~~~~~

❤Create an ASP Site Using Dreamweaver❤

Posted by kErTaS PeNseL at 23:31 0 comments
Good Morning U Olllzzzz!!!! ^_^ 
May this morning will give a thousands of meaning.. ^_^
huhu arini aku nk buat refleksi sket mengenai ape yang aku dah belajar and aku nk kongsikan dengan korang sume..still remeber ape yang aku cakap, ilmu perlu dikongsi agar boleh dimanfaatkan oleh orang lain..kite dapat jugak pahala..^_^
so, now ape yang aku dah belaja dalam process develop web is using Active Server Pages in Dreamweaver CS3. now lets start our journey to develop it..hehehe

First sekali kite open up Adobe Dreamweaver..huhuhu suke hati korang lah nk pakai edition bape..for me, aku gune Adobe Dreamweaver CS3 je..aku bukanlah architecture student kalo nk pki sampai CS6..CS3 nie pun masih bertatih lagi..aicehh..hehehe after korang open korang nye Adobe Dreamweaver korang akan dapat rupe ini..


Our purpose open dreamweaver nie sbb nk develop web..but fisrt of all kite kene create site dulu..tau x site tue ape? site nie actually a collection of files and folders that corresponds to a website on a server.


Step 1: Click 'Site' and Click 'New Site'


Step 2: Name the site (suke hati korang lah nk letak ape name site korang) then HTTP address tue korang type
http://localhost/(name project) then, click next.


Step 3: After click next korang akan keluarlah satu window seperti ini..huhu


untuk step ni, korang kene tick the second button sebabnye korang nk develop web using asp. so korang choose that U all want to use a server technology. pada kotak pilihan tue, korang pilih ASPVBScript...then click NEXT..


Step 4: Lepas click NEXT korang akan tgk window jenis nie pulak..


choose 'Edit and test locally (my testing server in this computer)'..mesti korang tertanya2 kan nape aku choose yang paling atas..bukan sbb aku suke nombor 1 tp sbbnye korg ingat x yang awl2 before create site kite install IIS? haaaa nie lah sbb nye..bile kite dah install IIS kat komputer, pc, laptop or what so ever, so komputer kite nie boleh digunakan sebagai local testing server..senang nk test web kite tue nnt..huhuhu then kene make sure yang tempat kite nk simpan file tue adalah dalam folder inertpub>wwwroot>(namefolderkite)..after dah confirm then click NEXT..jgn takut jgn risau xkan terbakar nye..huhuhu


Step 5: Testing File


for this step, korang kene test url...after test url just click NEXT..


Step 6: Choose 'No' and Click NEXT


Step 7: Click 'Done'


after click DONE, u already have ur site.. is it work rite??? and u can start ur work to develop web..huhuhu

so, inilah cara yang aku belajar dalam kelas Dr. Zaida mcm mane nk create site..huhuhu kat lab belaja gune pc..huhu so senang banyak lah..but then bile balik kolej buat gune lappy, baru lah nmpk masalahnye..but i can manage it with the help of my friends..thanks a lottt..mmuuaaahhhhh ^_^ erm pasnie ape lagi entry yang aku nk post eh? huhu itu kene tunggu kelas yang berikutnye lah..hehehe


❤Setup Database file using Ms Access❤

Posted by kErTaS PeNseL at 23:05 0 comments
hye alll!!!!! we meet againnnn... ^_^ last entry kite dah cite camne nk create site kan..so the next step yang aku blaja dalam kelas authoring after create site kite create database. 
Untuk ASP nye site, database nye kite create gune Ms Access..korang tau x Ms Access tue ape? hahaha lets check it out!! 


haaa nie lah rupenye Ms Access.. ^_^ aku pun before nie xtau jugak yang kalo nk create database utk website ASP gune Access..hehehe sbb nye before nie aku xpenah pun create database untuk website..ape2 pun through dis class baru lah aku tau segala-galanya..thanks a lot tue Dr. Zaida.. ^_^

so mcm mane start create database? hehehe u ollz boleh scroll ke bwh lagi untuk info seterusnya...


HOW TO SETUP DATABASE FILE USING MS ACCESS?
(Lets Go Through!!)

Step 1: Open MS Access (bile korang open MS Access akan appear mcm pic kat atas tue..)


Step 2: Create new database by click on 'Blank Database' and please look at on your right side..


Step 3: Change file name and save it in .mdb but before that we need to create 'data' folder in 'wwwroot' folder in  C:/inetpub  and after that need to change the path (kat mane file akan disimpan) as below:

C:/inetpub/wwwroot/data 


Step 4: After create database file boleh la insert data yang kita nak buat dalam web kite..

yiehaaa!!!!!!!!!!!!!! so now dah tau dah mcm mane nk create database gune Access kan? huhu inilah yang aku blaja dalam kelas Dr. Zaida yang cantikkk.. ^_^ kat bawah2 nie ade contoh database yg aku dah create untuk aktiviti dalam kelas..please be free to see yaaa.. 


Figure 1: Contoh Database 1
Figure 2: Contoh Database 2

so nie lah contoh2 database yang aku create..database nie aku create untuk form yang aku nk buat website aku...so ni je lah input utk entry kali ni...untuk next info boleh bace entry yang berikutnya yaa.. ^_^
Thanks guys kos sudi luangkan mase bace blog aku neh..hehehe..

~~~~~~~~~~~~~~~~~~~~~~~~~~~~~~~~~~~~~~~~~~~~~~~~~~~~~~~~~~~~

❤ Setup the Contact Form for Website ❤

Posted by kErTaS PeNseL at 01:43 0 comments
Evening allllll!!!!!!!!!!!

kali nie punye entry aku nk update pasal nk create form dalam website..erm aku gerenti korang mesti selalu google and online blog2 yang jual baju, accessories, tudung n lain2..so bile korang nk beli or order barang, admin blog tue mesti ask korang to fill up the form kan? so korang pun akan isi sume butir2 diri yang die nak kan? haaaa nie lah function nye...form tue create gune page dreamweaver and database tue bile kite key in data akan straight away simpan dalam databse file yang kite create gune access..maksudnye kat sini bile korang isi form tue, data korang sume akan disimpan dalam database file si admin/penjual tue..so bile die open database file die, die boleh tgk la rekod korang yang korang masukkan dalam form kat web td..hehehe tp untuk entry nie, aku bukan nk gtau mcm mane nk buat form jual beli tue..aku just nk tunjuk cr je..then pandai2 lah korg nk manipulate nye..hehehe sebagai contoh nye aku just create simple contact form seperti yang diajar dalam kelas authoring aku....


HOW TO CREATE THE CONTACT FORM?

Step 1: Create New Page in Dreamweaver. 
File > New > Blank Page > ASP VBScript  > Create.


Step 2: Insert a Form. Click Menu Insert. Click Form and select Form. (korang akan nampak red dotted line then korang boleh type form and insert text box)


Step 3: Bile dah siap create form kite boleh save..lecturer aku ajar kalo nk save, save in (filename).asp


erm..dalam kelas aku dah create contact form..and balik kolej aku try buat sendiri..at last aku berjaya buat same mcm dalam kelas..kat lab aku gune pc lab..kat kolej aku try gune lappy aku pulak..Alhamdulillah..I made it!!!! sile tgk kat bawah hasil keje aku....hehehe


contact form yang aku create dalam dreamweaver


so, dah siap dah contact form..after create contact form, kene buat INSERT RECORD..erm ape function insert record nie? ok yang aku faham insert record nie tujuannye nk link kite punye web nie dengan database..so setiap maklumat yang diisi terus akan disimpan kat database file yang kite create gune MS Access..but, mcm mane nk buat insert record? lets check it out!!!


HOW TO DO AN INSERT RECORD?

Dalam lab, kitorang diajar oleh Dr. Zaida step by step untuk buat insert record..senang je..korang scroll kat bwh..ini aku buat berdasarkan kefahaman aku dalam kelas..


Step 1: Click 'Server Behavior' Tab.

Step 2: Click (+) sign and choose Insert Record. (bile click insert record akan appear window mcm pic kat bwh)


Step 3: Make sure connection is ok, database appear as we did dalam Access, then after sume nye selesai just click ok. If it is not ok it means that there is something wrong with the connection..


~Sekian Terima Kasih~ Peace!!!!


Wednesday 3 October 2012

❤Testing Server❤

Posted by kErTaS PeNseL at 22:19 0 comments
YuhHuuuuuuuuuuuu!!!!!!!!!! Im back!! ^_^ for sure korg rindu nk bace entry aku kan..ape lah agaknye aku nk post untuk hari nie...korang agak2 ape? erm? pikir cepat..huhu kite kene sentiase melatih diri kita untuk berfikir kalo x otak boleh mati woooo...so untuk melatih diri menjadi seorang yang high order thinking skill kene lah selalu berfikir untuk generate idea2 baru..aicewaaahhhh dah mcm kaunselor dah aku neh..hahaha lets STOP it !!!!! now we turn back into the real world of authoring class..hehehe ok dear guysss, last entry aku dah post on how to check either our lappy dah di'instal'kan dengan IIS or belum kan..now this time punye entry aku nk post pasal mcm mane kite nk test kite nye server tue running or not running..Let's CheCk iT!!! 


HOW TO TEST OUR TESTING SERVER IIS?


Step 1: First of all click 'Start'


Step 2: Click Control Panel ( view by large icon as shown in a picture below)


Step 3: Click 'Administrative Tools' 


Step 4: Double Click on IIS Manager and U will see the window appear as below.


kalo korang tgk betul2 pada screen window IIS manager nie, on the right hand side ade column action > manage server.. under manage server tue ade button restart, start, stop. if button start is dim and button stop is bright meaning to say ur IIS is running...got it? 


Step 5: Open any web browser and type localhost on the address bar


so after dah install IIS and test the server kite dah boleh develop web. my Q is kenape kite kene install IIS untuk develop web? sebabnye kite nk gune ASP..untuk ASP testing server nye adalah IIS..actually melalui experience yang dialami banyak jugak lah difficulties nk install IIS and test IIS nie..tp everything bukan lah dibuat berseorangan...selain knowledge yang aku dapat dari Dr. Zaida, banyak jugak info yang aku konsi dari rakan2..at last berjaya jugak..ALHAMDULILLAH..huhu ^_^ so now after installation and testing our server we can start to create our site using dreamweaver..so mcm mane nk create site sila bace entry yang seterusnya.. good Luck yaaaa.. ^_^


❤Check IIS on Our Lappy =) ❤

Posted by kErTaS PeNseL at 20:59 0 comments
hollaaaaaaaaa!!!!!!!!!!!!!!!! ^_^
ok guys..last entry aku dah share mcm mane nk install IIS rite? so, for this entry as i promise early aku nak share mcm mane nak check yang lappy kite tue dah berjaya di'install'kan dengan IIS..now lets check it out yooo!!!! huhuhu


HOW TO CHECK OUR LAPPY ALREADY BEEN INSTALLED WITH IIS?


Step 1: Click 'Start'


Step 2: Click 'My Computer'


Step 3: Double Click 'Local Dick C:'


Step 4: In Local Disk C you will see folder 'Inetpub' as highlighted below.


Step 5: Open Inetpub folder and you will see 'wwwroot' file as below. 
All asp or site that U create will be save inside 'wwwroot' file. 


seeeee!!!!!!!!!!!!!!!!!!!! bile dah ade inetpub folder dalam local disk C: means that our lappy dah di'instal'kan dengan IIS secara jayanya..huhu bangga sekejap..ngeh3x..so inilah hasil yang belaja dalam kelas authoring..huhuhu before nie aku xde lah pandai bab2 nie..asyik harap org je..but now I make it by my own..huhu aicehhhh... ^_^ thanks a lot to Dr. Zaida because teaching us..from ZERO to HERO..huhu
ehhhhhhhhhhhhhhhhhh wait the minute..nie baru check IIS dah install dgn baik or belum..tp selain install n check, kite kene test jugak server nie..kalo xleh jln towards the end susah lah kite..so ape2 pun after install and check kite kene test jugakkkk...so my Q? how to test our IIS running or not running???? huhu pikir2kan lah..nk jawapan dari aku korang kene tunggu yang berikutnye lah ye..aku xlarat nk type panjnag2 dah nie..hehehe 

Tuesday 2 October 2012

❤ WEEK 3: Installation of IIS ❤

Posted by kErTaS PeNseL at 20:21 0 comments
hye guys.. ^_^ we meet again..sorry ya because dah lame x update my reflection on my authoring system class..actually i already done it draftly on my book..just not transform it into blog..hehehe salunye refleksi aku buat dlm buku dulu..hehehe lagi satu aku record ape yg lecturer aku ckp dlm kelas..so nk analyze setiap ilmu yang disampaikan tue take time sket..hehehe mesti korang xsabar kan nk tau ape yg dipelajari oleh aku dalam kelas authoring nie..hehehe serius ckp kelas nie sgt besttt...tp tuk week 3 as a first stage of learning dreamweaver, kitorang belaja how to install IIS. korg tau x ape itu IIS? huhu actually aku pun xtau sebenarnya..so after dah masuk kelas nie barulah aku tau..IIS nie adalah singkatan kepada Internet Information Server (IIS)..in short we call as IIS..kalo among students edu tech kitorg xdelah beria beno nk sebut panjang2..huhuhu kitorang shotform kan aje..hehehe jimat sket perkataan nk ckp..huhuhu IIS nie actually testing server..so kalo kite nk built up web ke kene ade testing server tuk test kemenjadian web yang kite develop tue.. ^_^ antara info yang aku dapat, if IIS xde, kite xboleh nk develop web using ahp or php through dreamweaver..so untuk hari ni nye dr.Zaida ajar mcm mane nk install IIS..so sekarang nie dengan bangga nye aku boleh lah ckp yg aku dah pandai dah nk install iis..huhuhu tp different types of windows cr nk install nye agak beza sikit la..so aku dibantu oleh rakan2 yang terer..ade yg kasi input through discussion via facebook page yang dicreate just for the purpose tuk discuss and ask if got any problem..hehehe untuk membuatkan korang xckp aku nie kedekut ilmu, so skrg aku nk kasi ilmu mcm mane nk install IIS..so lets take a look.. ^_^

HOW TO INSTALL INTERNET INFORMATION SERVER???


Step 1: Click 'Start'


Step 2: Click 'Control Panel'


Step 3: Click 'Programs (Install and Uninstall Program)'


Step 4: Click 'Turn Window Features on or off'


Step 5: Tick all box for IIS box as below.


Step 6: Tick at box 'IIS Hostable Web Core' as below.


Step 7: Click 'OK'

yaaaaaaaa..............its DONE!!!!! easy rite? huhu at first agak complicated skit lah sbb kat lab pc nye window len..lappy aku gune window 7..so tutorial kat atas neh for those yg pki window 7...oppsss!!!! erm mcm mane nk tau kite nye lappy nie dah berjaya di install dengan IIS? hohoho jawapannye..lets wait for the next entry yaaaa.... ^_^ 

nie link video yang sedikit sebanyak boleh tolong yang face the problem..


kErTaS pEnSeL Template by Ipietoon Blogger Template | Gift Idea